
 https://doi.org/10.46430/phen0131
Contents
- Introduction to the lesson
- Plan your exhibition
- Gather metadata for your exhibition’s digital collection
- Prepare the metadata for your CollectionBuilder exhibition
- Setting up CollectionBuilder
- Customizing your digital exhibition
- Conclusion
Introduction to the lesson
This lesson will teach you how to use CollectionBuilder (CB) to create and customize a digital exhibition featuring digital objects hosted on another platform, such as the Internet Archive (IA).
CollectionBuilder is an open-source framework for publishing metadata-driven digital exhibitions using static web technologies. The software’s main objective is to provide a practical, sustainable means of disseminating collections of digital objects. The CollectionBuilder framework is an alternative to digital exhibition publishing platforms, such as Omeka (for which there is also a Programming Historian lesson), Wax, and Spotlight. CollectionBuilder can also serve as a pedagogical tool, providing an entry point for students to learn interoperable digital humanities skills, such as metadata management, GitHub file management, Markdown and basic web development. It also enhances general technical literacy by explaining how web publishing works, while prioritizing the values of openness, transparency, and sustainability outlined in the Lib-Static methodology.
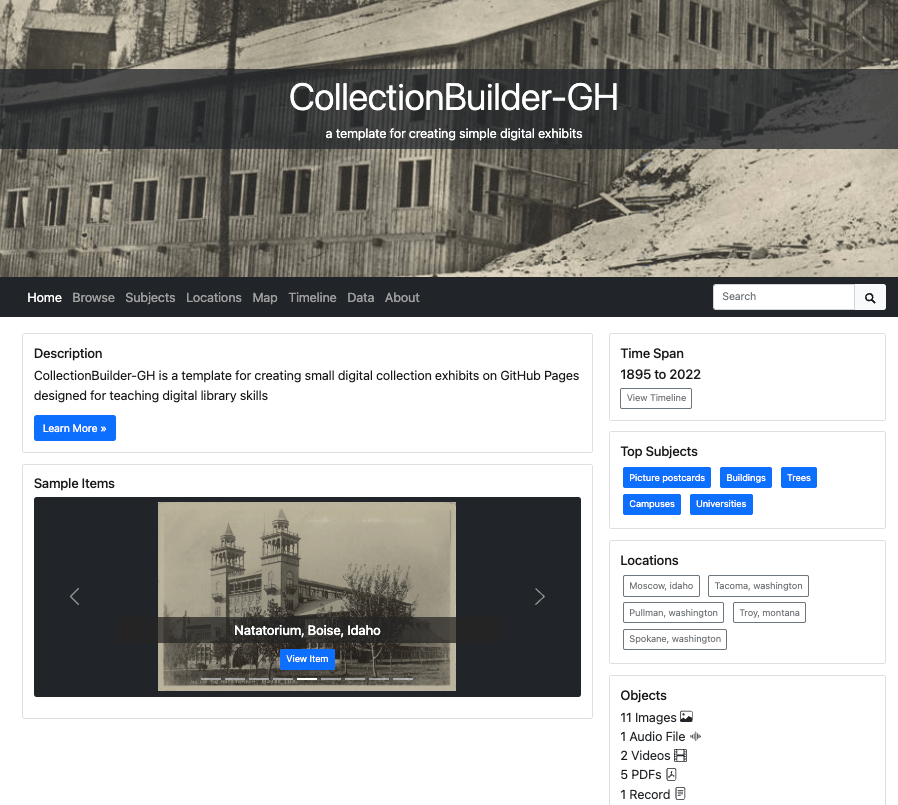
Figure 1. Screenshot of CollectionBuilder-GH demo site.
CollectionBuilder is a project of the University of Idaho Library’s Digital Initiatives and the Center for Digital Inquiry and Learning (CDIL) that follows the Lib-Static methodology. Lib-Static is a community which seeks to ‘rethink how we do digital infrastructure in libraries to recenter our technology choices around sustainable, pragmatic, and minimal approaches.’
CollectionBuilder offers three different templates for building a digital exhibit:
- CB-SHEETS allows you to update collections directly from a Google Sheet, making it ideal for prototyping, collaboration, and viewing changes in real-time.
- CB-GH requires that you upload your metadata spreadsheet to your repository and allows for more customizations, making it suitable for teaching and learning GitHub, Git, and other web workflows
- CB-CSV allows for the most customization, but you must download software to your computer. You will need this template if you want to work with advanced digital objects like 360-degree panorama images, compound objects (such as a scrapbook or an archival folder), and multiples (such as a postcard with both the front and back, or text and its transcript).
You can browse examples of CollectionBuilder sites to get a sense of what is possible and the difference between the templates.
This lesson will use the CB-GH template, which has fewer software dependencies and relies on a collection of digital objects already available online. In our example, we used items available in the Internet Archive (a non-profit digital repository providing free public access to digital materials), but you can link to items available elsewhere, including YouTube, Vimeo, or any repository that gives you the digital object’s filename (including the file extension).
While other CB tutorials ask you to upload digital files directly to GitHub, this lesson links to digital objects already hosted online. You will learn how to work with canonical versions of objects (the authoritative instance of the object in their original repositories) rather than creating and hosting copies. This approach to building digital exhibits allows you to:
- Engage with larger, existing digital collections without requiring additional infrastructure
- Develop metadata literacy through the practice of referencing and relating, rather than hosting
- Understand how digital ecosystems such as the Internet Archive can be integrated into custom web publishing
- Prioritize curatorial interpretation and presentation over technical stewardship
By using already-hosted objects, students can create meaningful exhibitions without digitizing or uploading their own collections, making this option more inclusive and scalable.
While linking to externally hosted objects offers real advantages, it comes with trade-offs worth acknowledging. External links are vulnerable to link rot, meaning that URLs can break if a host reorganizes, discontinues a service, or goes offline. Dependence on a specific platform, including the Internet Archive, introduces a single point of failure: if that service experiences downtime or removes content, your exhibit will become inaccessible.
The CB-GH template can also be used for projects with metadata-only records and zero digital objects. Projects can later be moved to the more advanced CollectionBuilder-CSV template for further customization by following the CollectionBuilder documentation.
Prerequisites
To follow the steps in this lesson, you will need the following:
- Knowledge of how to write in Markdown (see Getting Started with Markdown by Sarah Simpkin)
- Knowledge of how to manage a basic GitHub repository (see Getting started with GitHub Desktop)
- Experience with managing metadata (structured descriptive information such as title, creator, and date) in the
.CSVformat (comma-separated values, a plain text format for tabular data)
This lesson should take about 3 to 5 hours to complete if you have your metadata ready. Each example in this lesson is taken from our demo site, so you can see the relationship of each step to the final result and the GitHub repository.
Plan your exhibition
What story do you want to tell?
Online exhibitions can expand access to digital objects by enabling curators, like yourselves, to add narrative context, offer interactive experiences, and enrich metadata. Before you choose which digital objects to feature in your exhibition, define your exhibition’s goals, target audience, and desired experience. This will give you a good starting point for curating your content, choosing which metadata to include, and determining which CollectionBuilder visualization elements to use.
Some questions to consider include:
-
Who is the primary audience of the digital exhibition? Being specific will help you shape both your design and your choice of digital objects. Are you making the exhibition to celebrate aspects of a larger collection? Is the digital exhibition related to a physical exhibition? Each situation would involve unique audiences you’d want to consider.
-
What do you want the audience to see and do when they come to the digital exhibition? Do you want your audience to read a series of essays in a set order, or do you want them to explore the collection on their own? If your collection has geographic or time-based metadata, do you want them to browse on a map or a timeline?
-
What kind of digital objects do you want to include? Outlining what types of material you wish to appear in your collection will help you think about what kind of metadata you need to include and how you want to configure your item page. For example, are you featuring single images or will you include books or other multi-page items you would like people to flip through and read? Or do you want to feature just a single-page opening of a book? If you have photographs and postcards, do you want to show both sides of the material? If you are interested in including more complex multi-page digital objects, we recommend reading up on Compound Objects and Multiple item types in CollectionBuilder’s documentation, which we do not cover in this lesson.
For further reading on this topic, the Art Libraries Society of North America’s 2021 ‘Best Practices for Library Exhibitions’ includes a section on Digital Exhibitions, and the Smithsonian’s 2018 ‘Exhibits’ Guide to Exhibit Development’ can be applied to online exhibits.
Gather metadata for your exhibition’s digital collection
To prepare the exhibition, you first need a collection of objects described in a CSV that we can map to the CollectionBuilder metadata guide to ensure all exhibition components function properly. This approach prioritizes working with canonical versions already maintained in established repositories, allowing you to focus on curatorial interpretation rather than digital stewardship.
Optional: Upload your own digital collection materials first
While this lesson focuses on using digital objects already available on the Internet Archive, you also have the option of uploading your own collections of digital items.
The Internet Archive provides free, unlimited hosting for a variety of file types, including images, audio, video, and text. This includes automatically converting files into web-friendly derivatives and making text files searchable via optical character recognition (OCR). Anyone with a free account at the Internet Archive can upload media one file at a time or in bulk using their command line tools. For more information, the Internet Archive provides a basic uploading guide.
While the Internet Archive offers cost-effective hosting, once an item is uploaded and indexed, it is very difficult to remove. Be sure the items you upload are meant to be public. Generally, you should only upload material that you own, that is in the public domain, or that falls under Creative Commons licenses.
The CollectionBuilder documentation also has information on how you can locally host small collections directly in your GitHub repository.
Query and download collection metadata from the Internet Archive
If you are like us and have a collection of described digital objects already in the Internet Archive, you can use their Advanced Search page to craft specific queries and export the existing metadata to a CSV file.
The first step is to use the advanced search form to create a query that isolates the objects you want to download. You can also construct a query with keywords, Field-Specific searches, and Boolean operators. Experiment with different queries until you get the results you want. Every time you run an advanced search using the form, IA converts your query to their preferred query syntax, which you will use in the query box.
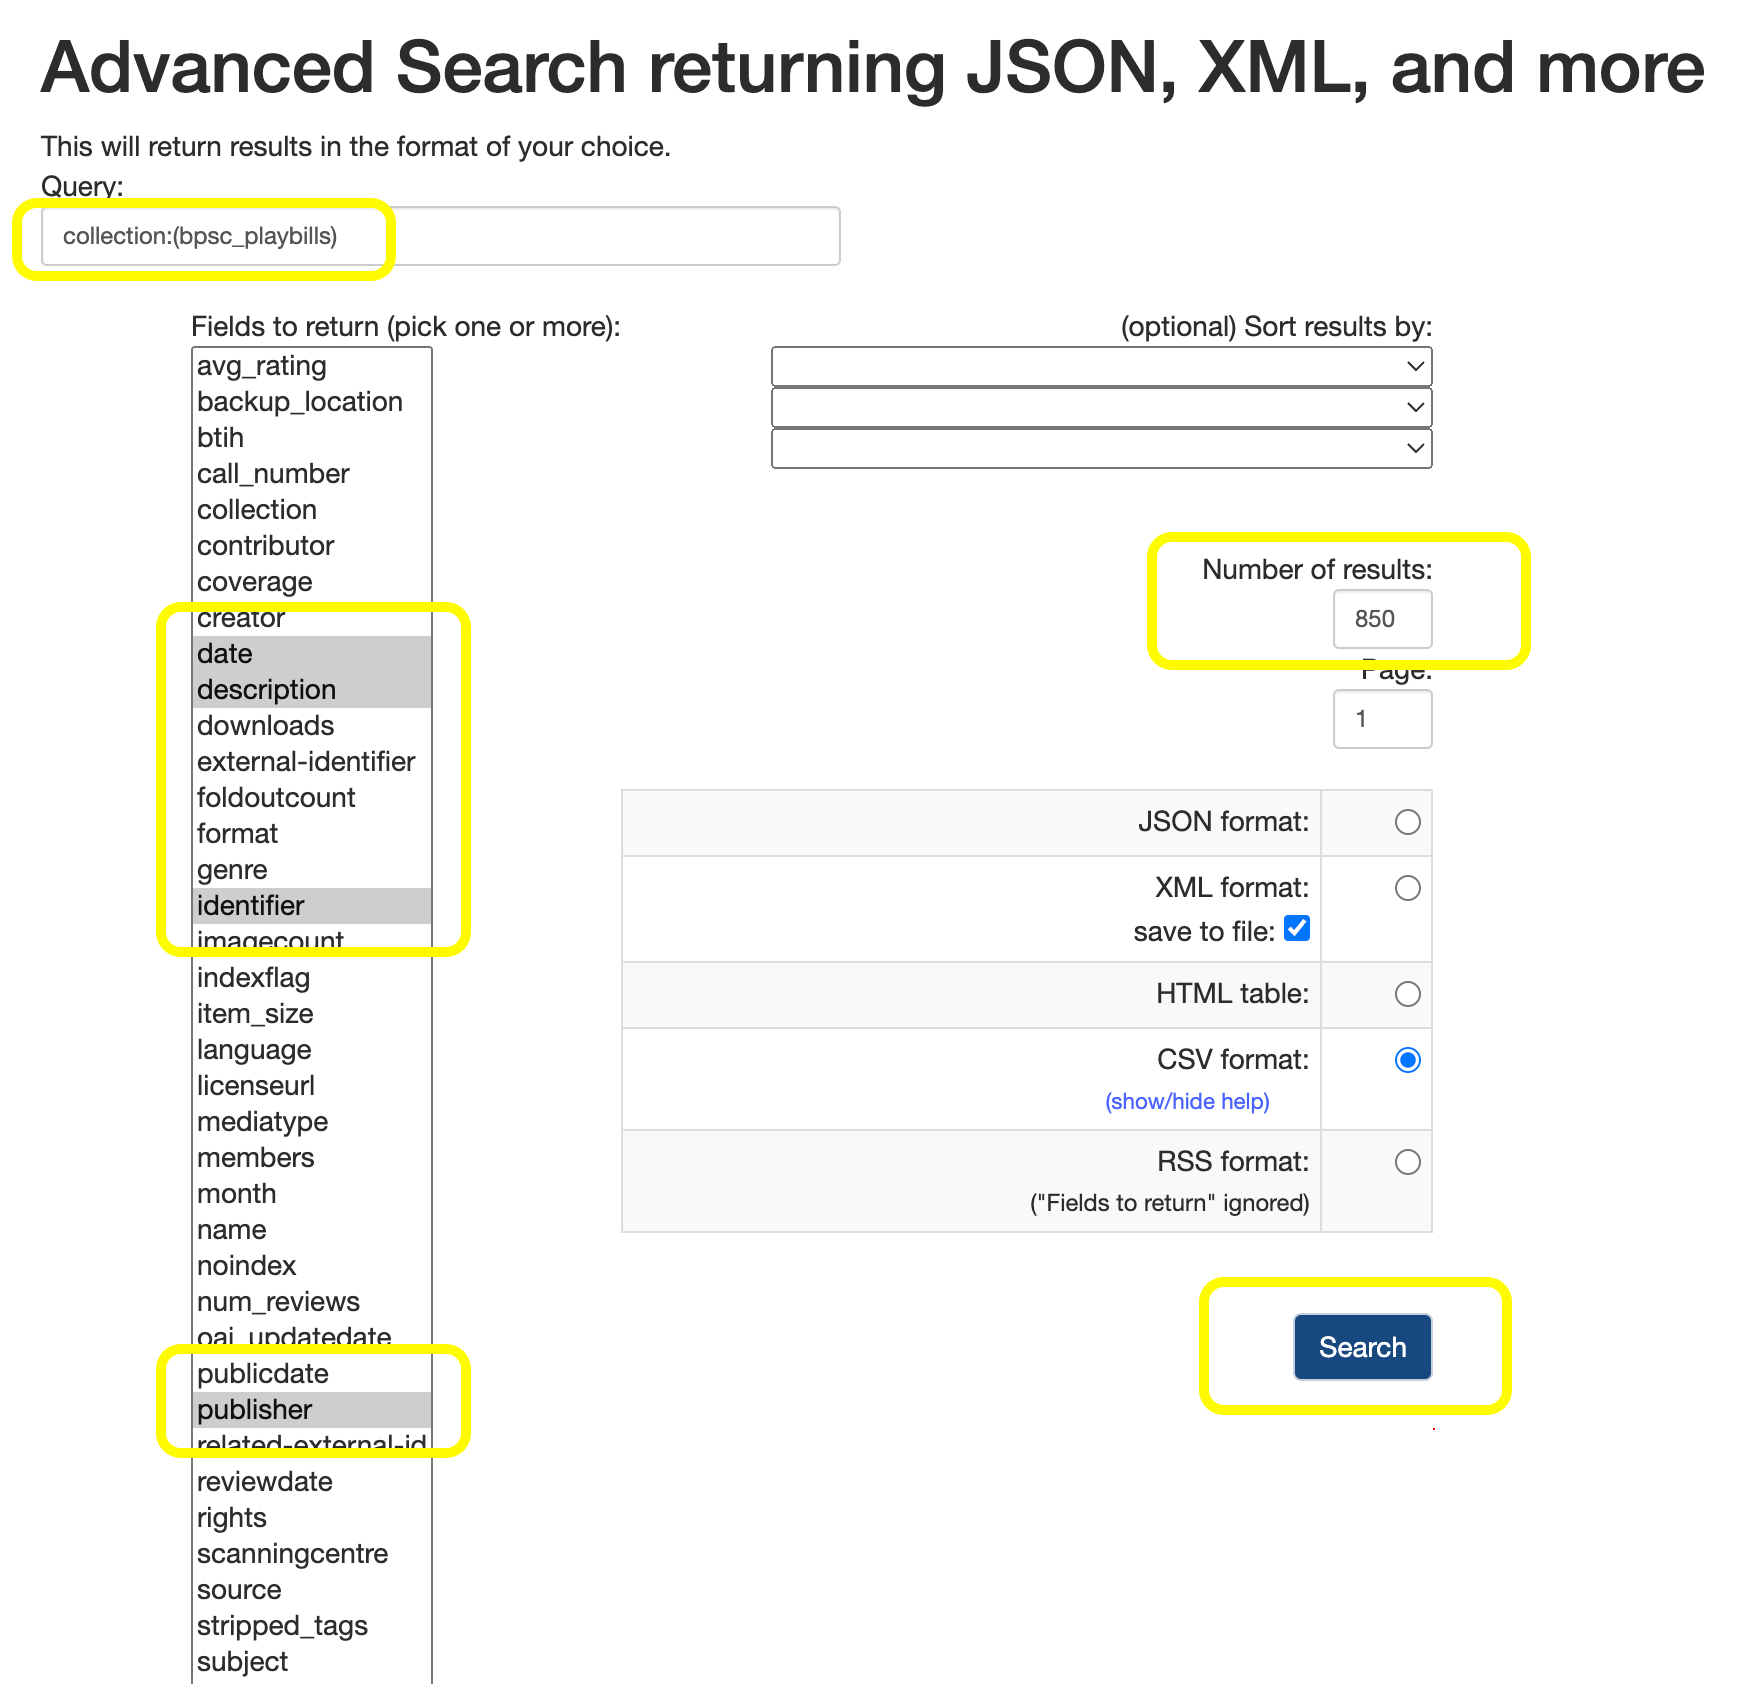
Figure 2. Screenshot of the Internet Archive’s advanced search interface.
Now that you have a query, the second step is to download the desired metadata fields in a usable format. Select which metadata fields you want to include in your download from the list on the left-hand side. This list contains both the descriptive metadata as defined by the uploader and the administrative metadata from the IA platform. If you are not sure which fields you want, you can select all and review them later. For more information on what each metadata field contains, you can look at the IA metadata schema, but not all metadata in IA will follow this schema, so be cautious!
Choose the number of results you want and CSV format. Once your file has been downloaded, ensure that the name of the file only contains lowercase letters, no spaces, and no special characters (e.g. ph-demo-playbills.csv). You may need to rename the file if this is not the case.
In our example exhibition, we are using a collection of English playbills from Bruce Peel Special Collections at the University of Alberta Library, which was digitized in 2019 and is available on the Internet Archive. Because we want to use the entire collection of objects, we can retrieve the playbills using the collection identifier bpsc_playbills, which appears in the URL. When we do our test search, IA converts our search into their desired query syntax collection:(bpsc_playbills). For another example, if we only wanted to download the Hamlet playbills in this collection, we would use the query title:(hamlet) AND collection:(bpsc_playbills).
Once you have downloaded your metadata, you will want to clean it up to include only the necessary information for your exhibition. Some helpful tips on metadata can be found at the following links:
Prepare the metadata for your CollectionBuilder exhibition
To ensure your exhibition works properly, your metadata must follow the structure expected by CollectionBuilder. This means your CSV file must contain specific fields with correct formatting so the template can display items, maps, timelines, and other features.
Below, we explain only the fields required for this example project. You can explore the complete metadata guide anytime by checking out the CB-GH Metadata Template.
CollectionBuilder Required Fields
The following fields are required in CollectionBuilder:
-
objectid: The objectid field is how CollectionBuilder identifies each item in your collection and connects it to its metadata. Requirements for objectid:
- Must be all lowercase
- No spaces or special characters (hyphens
-and underscores_are allowed) - Should be unique for each item
In our example, the Internet Archive identifier is already a suitable objectid. You simply need to rename the corresponding column header in your CSV file to objectid.
-
filename: This field contains the direct URL to your digital object, such as a PDF, image, or audio file. For objects hosted on the Internet Archive, you can choose the display option that works best for your exhibition. In the Internet Archive, a variety of display options, such as the digital object record, a one-page view, a two-page spread, a thumbnail view and then you can apply theatre view to any of these display options if you want to focus on the digital object and not the metadata. In our example, we want visitors to see the full-screen flipbook version of each item, so we use URLs such as
https://archive.org/details/BP_CCTT_0002/mode/thumb?view=theater. Note that every Internet Archive URL uses the IA identifier (now your objectid), so you can use this construct these URLs fairly quickly using formulas such as concatenate in Excel or Google Sheets. -
title: This should correspond to a title of the original object. It is recommended that it be short and descriptive. In our example, some playbills have more than one play, so we have separated the play titles with a semicolon. For example: Othello; The Deserter
-
format: This field indicates the item’s media type. Since CollectionBuilder uses logic based on format to display objects, this is a key field for ensuring the interactive visualizations and item pages function correctly. If there are errors or anomalies, some pages will not work. For normal items, the value of this field should match the standard MIME type corresponding to your item’s file, consisting of a type and a subtype concatenated with a slash (
/) between them. This can generally be inferred by looking at the file extension (.jpg,.pdf, etc). The common MIME typeformatvalues supported by CB-GH are:- Image:
image/jpeg,image/png - Document:
application/pdf(as in our example of the playbills) - Audio:
audio/mp3 - Video:
video/mp4
- Image:
Metadata Fields used for visualizations
CollectionBuilder automatically creates views or entry points to the collection using the information provided in the metadata file. These will generate interactive views to explore the collection on different pages. Each ‘extra’ page needs a different type of information, which is explained below:
-
date: This field typically refers to the date of creation or publication of an object and is used for sorting and displaying on the timeline. The format to follow is
YYYY-MM-DD, with the four digits of the year being the minimum value needed to form the timeline. If you have date information that does not fit into this ISO format, such as?-02-24ordate unknownor1900s, you can add a new metadata field under a different name so that this information is displayed with the items, but not included in the timeline visualization. -
map: To create a map, you need the metadata fields in the columns latitude (north-south information) and longitude (east-west information), that is, the coordinate data of a location corresponding to the object you present in the exhibition. Our playbills collection does not have geographical metadata such as latitudes and longitudes, so we have done some research into possible locations of the listed theatres and added them to our demo to give you an idea of how the map works.
-
subjects: Create a word cloud with the topics that each object deals with in the subject column. You can put multiple topics in each box (for each object) and separate them with a semicolon (
;). In our example, each playbill has been given genres such ascomic drama; comedy; extravaganza, which follow the order of appearance on the playbill.
Optional fields
CollectionBuilder templates can support as many descriptive metadata fields as you want, following the interests of the digital collection’s creators and audience.
Some common additions include:
-
creator: Name of the person who created the original object that has been digitized, or in our case, the name of the playwright.
-
description: A brief note about the object.
-
source: Designates the source of the object, such as its location in the physical collection.
-
language: You can indicate the language associated with the object. CollectionBuilder recommended best practice is to use a controlled vocabulary such as the ISO 639-2 language code list.
-
rights: A free text statement containing information about the audience’s rights over digital objects. Complements the standardized rights statement.
-
rights statement: Link to a standardized interoperable rights statement from rightsstatements.org.
Setting up CollectionBuilder
Before you can set up your digital exhibition, you will need a GitHub account for your archive, library, museum, or personal use. These accounts are free and can be used for various purposes. Once you have an account and are logged in, you can proceed with the lesson. More information on working with GitHub.
Clone the repository
To set up CollectionBuilder for your exhibition, you first need to copy the template you want to use, which in our case is collectionbuilder-gh.
In the top right-hand corner, you will see a Use this template button. If you don’t see this button, make sure you are signed into your GitHub account.
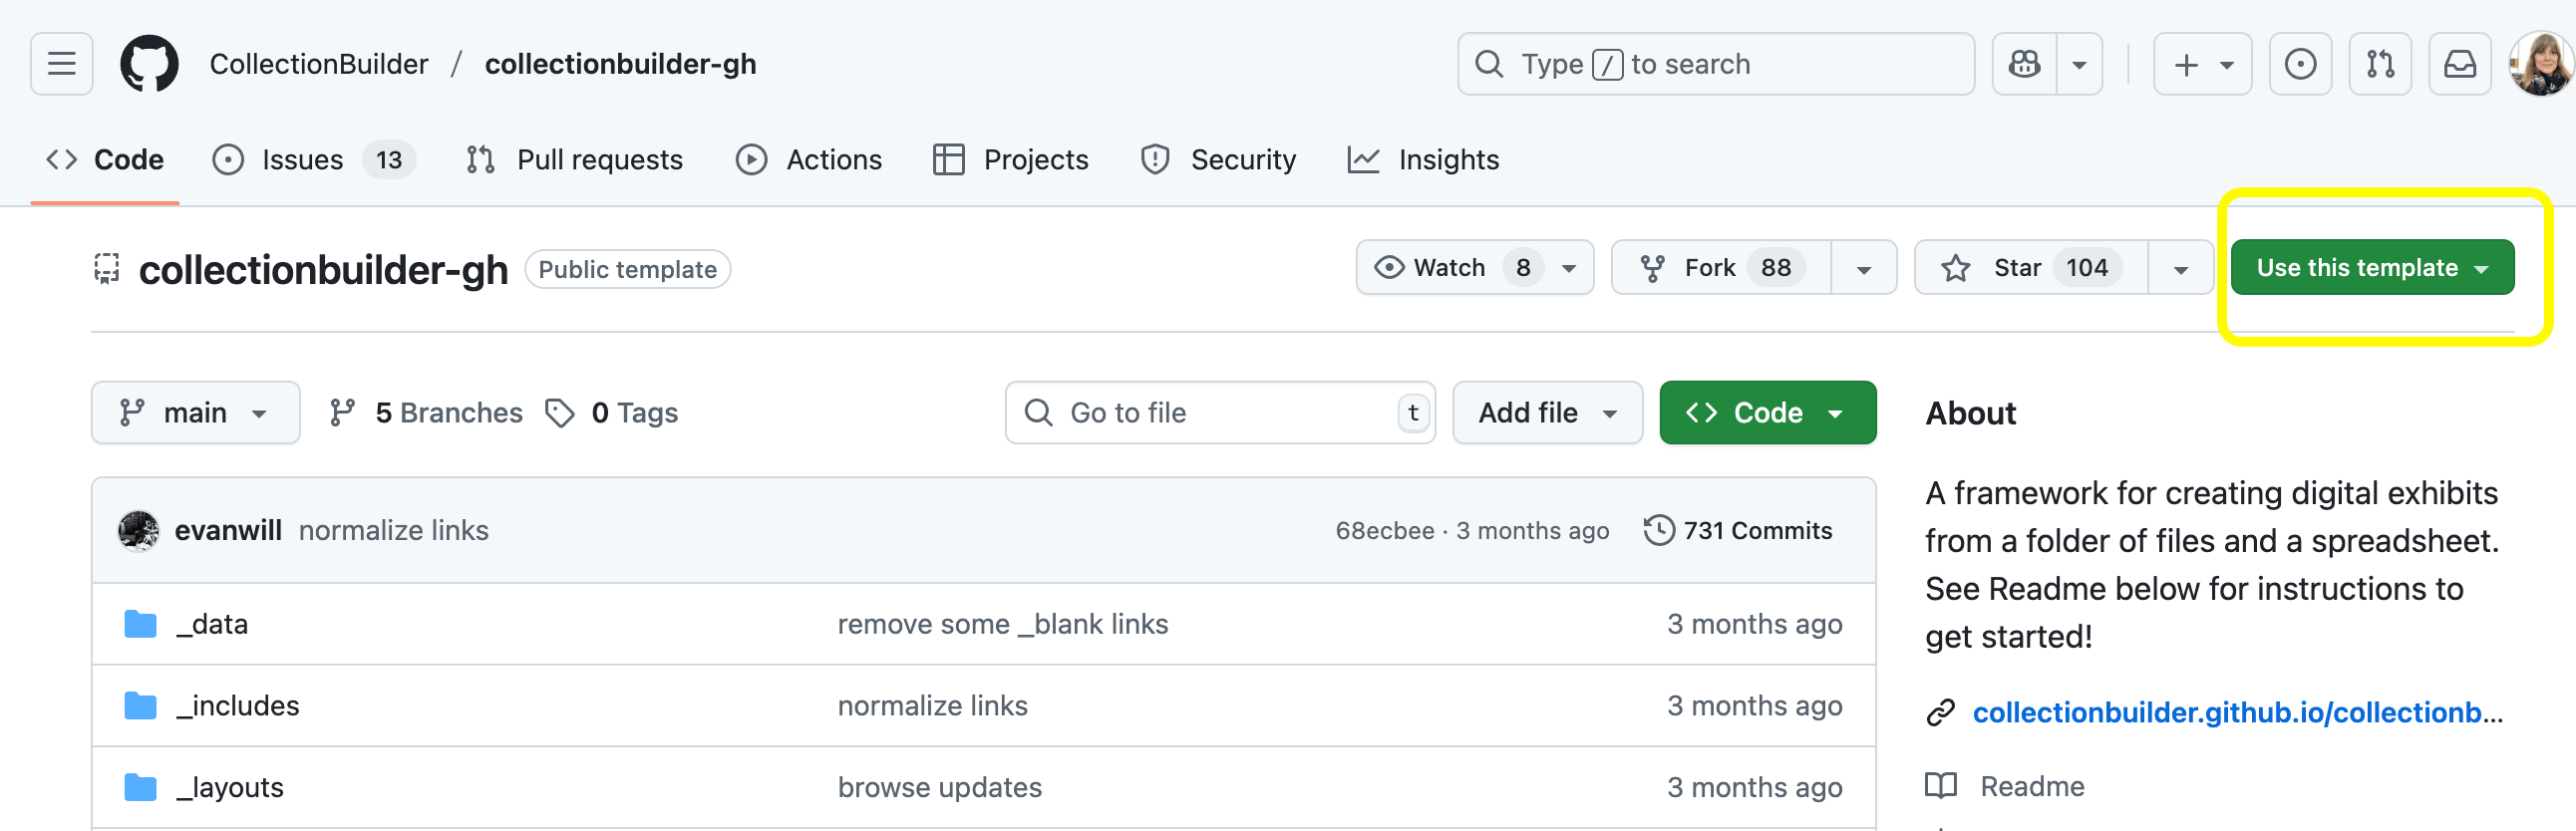
Figure 3. Screenshot of the CollectionBuilder GitHub repository with the Use this Template button highlighted
When you click on the Use this template button, you will have two options. Choose Create a new repository. This will let you copy all of the template files, with all the framework repository defaults, to your GitHub account so you can start building your exhibition.
In the Create a new repository screen, you must name your new repository. The name will be in your URL and needs to be unique. You can also make your Github repository public or private. We recommend keeping your repository public so you can share your work and get help if needed. Note that free GitHub accounts require a public repository to use GitHub Pages to host a website.
Repository contents
Now that you have cloned the template for your exhibition, let’s take a closer look at each folder and its role in your site.
-
_data: Contains three types of files that help form the ‘skeleton’ of the display. The demo and template comma-separated values (CSV) files are examples for various digital object types and can be left alone as references. We will later be adding your metadata file to this folder. Several configuration files let you edit the vocabulary for browsing objects (
config-browse.csv), viewing the map (config-map.csv), metadata (config-metadata.csv), general navigation or menu (config-nav.csv), search (config-search.csv), and a table (config-table.csv). Lastly, there is a YAML type file (a human-readable data serialization format) for configuring the page theme, which you do not need to worry about. -
_includes and _layouts: These folders contain the HTML files that make up many of the features of the CollectionBuilder tool. In this lesson, we will complete all customization without touching these files.
-
_sass and assets: This is where you will find the SASS (Syntactically Awesome Style Sheets) files that provide the visual side of the web page (colours, font sizes, etc.) and the JSON (JavaScript Object Notation) files that make everything work. Editing the CSS or JSON is not covered in this lesson, though you may use the assets folder to add images such as a banner.
Upload your metadata
From the homepage of your repository on GitHub, click on the _data folder. This is where you will upload your metadata file. You will also notice several demo and template files in the website framework for reference. While not necessary for your exhibition, we recommend leaving them as is so you can reference them later.
To add your metadata file, click the Add File button at the top right corner and follow the prompts to upload your CSV file.
After you add a message and click the Commit changes button, your file is in the repository.
Configuration
Since your _data folder contains several metadata files, the next step is to tell the CollectionBuilder template which one to use for your exhibition.
To do this, we will edit the _config.yml file. Under the heading # COLLECTION SETTINGS change line 37 metadata: demo-metadata to the name of your metadata file you just uploaded. In our example, we changed it to metadata: ph-demo-playbills.

Figure 4. Screenshot of the relevant section of the config.yml file showing where to point CollectionBuilder to your metadata file.
Publish your site
At this point, while you could skip to the later sections of this lesson to fully customize your exhibition before publishing your site live on the web, it can be helpful to publish at this early stage so you can see the changes you have already made and ensure the metadata and objects are working as expected.
To publish your site using GitHub Pages, you just need to edit a few settings. From your repository home page, click on the Settings option at the top right.
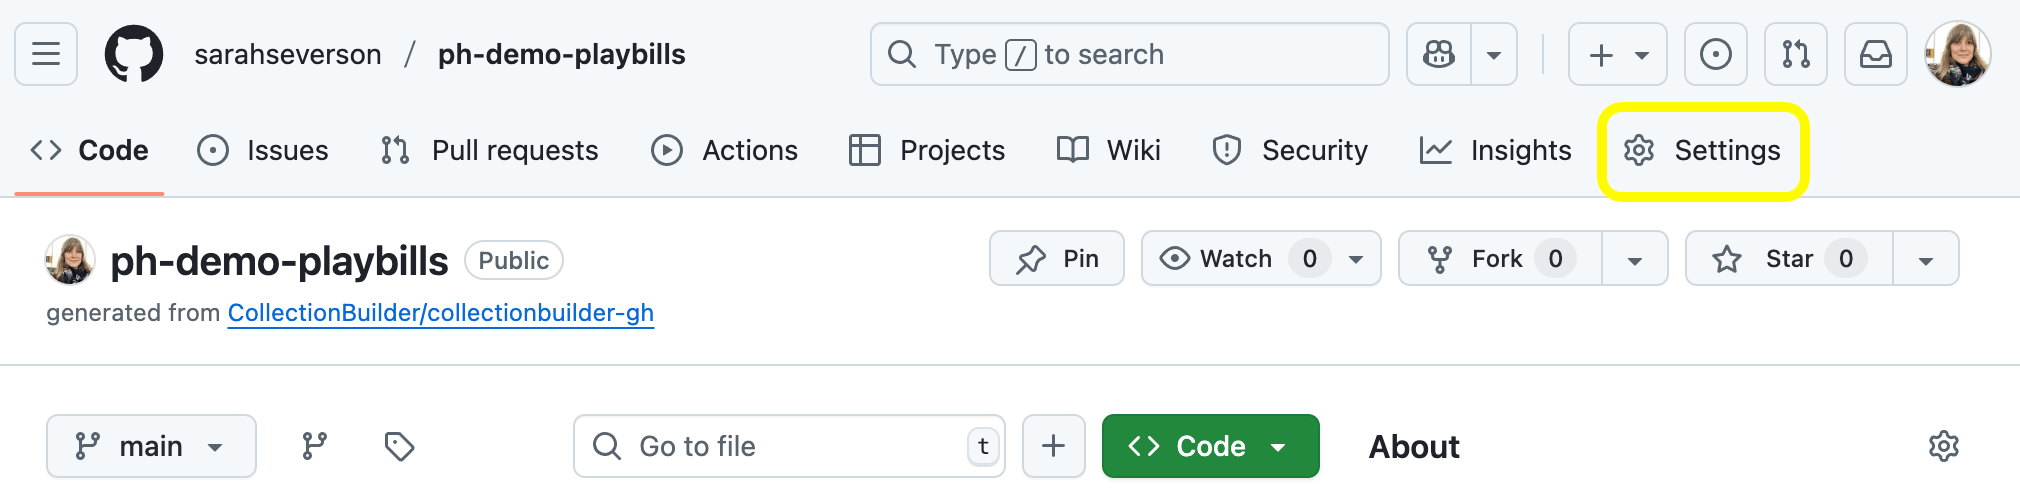
Figure 5. Screenshot of GitHub demo repository page with a yellow circle around the Settings button.
Select Pages from the left side menu:
- Under Source, leave the Source dropdown option as Deploy from a branch.
- Use the Branch dropdown to change from none to main (leave the folder option as
/root). - Click the Save button.
It will now take GitHub a few minutes to build your site for the first time using the contents of your repository.

Figure 6. Screenshot of the GitHub message you will get while GitHub is building your site.
When your site is ready, refresh the page, and you will see the URL to your live site. The URL will follow the pattern: https://username.github.io/repository-name
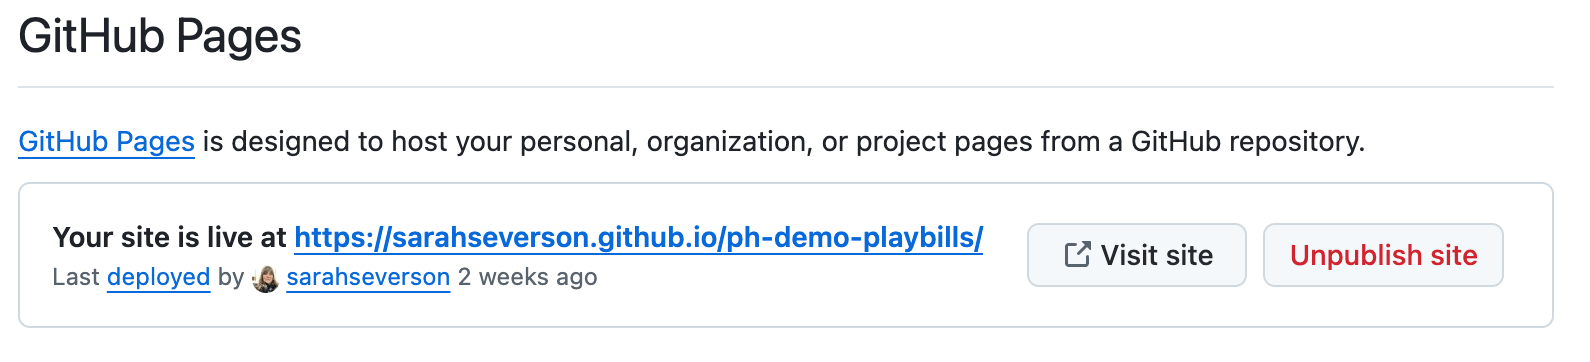
Figure 7. Screenshot of the message you will receive when your site is live.
Click on the link, and VOILA, your digital exhibition, using the defaults from the CollectionBuilder template, and your metadata are live.
Troubleshooting
Did you follow all the steps above and still not see what you expect? A common issue is that your spreadsheet contains some UTF-8 Errors, which prevents the metadata from being displayed.
If this is the case, check your metadata sheet to see if your field names match exactly the ones in the metadata template. For example, objectID is not the same as objectid.
In addition, check if all of your commits or changes have been processed. You can click the clock icon with the number of commits and check whether it has a green check mark next to it.
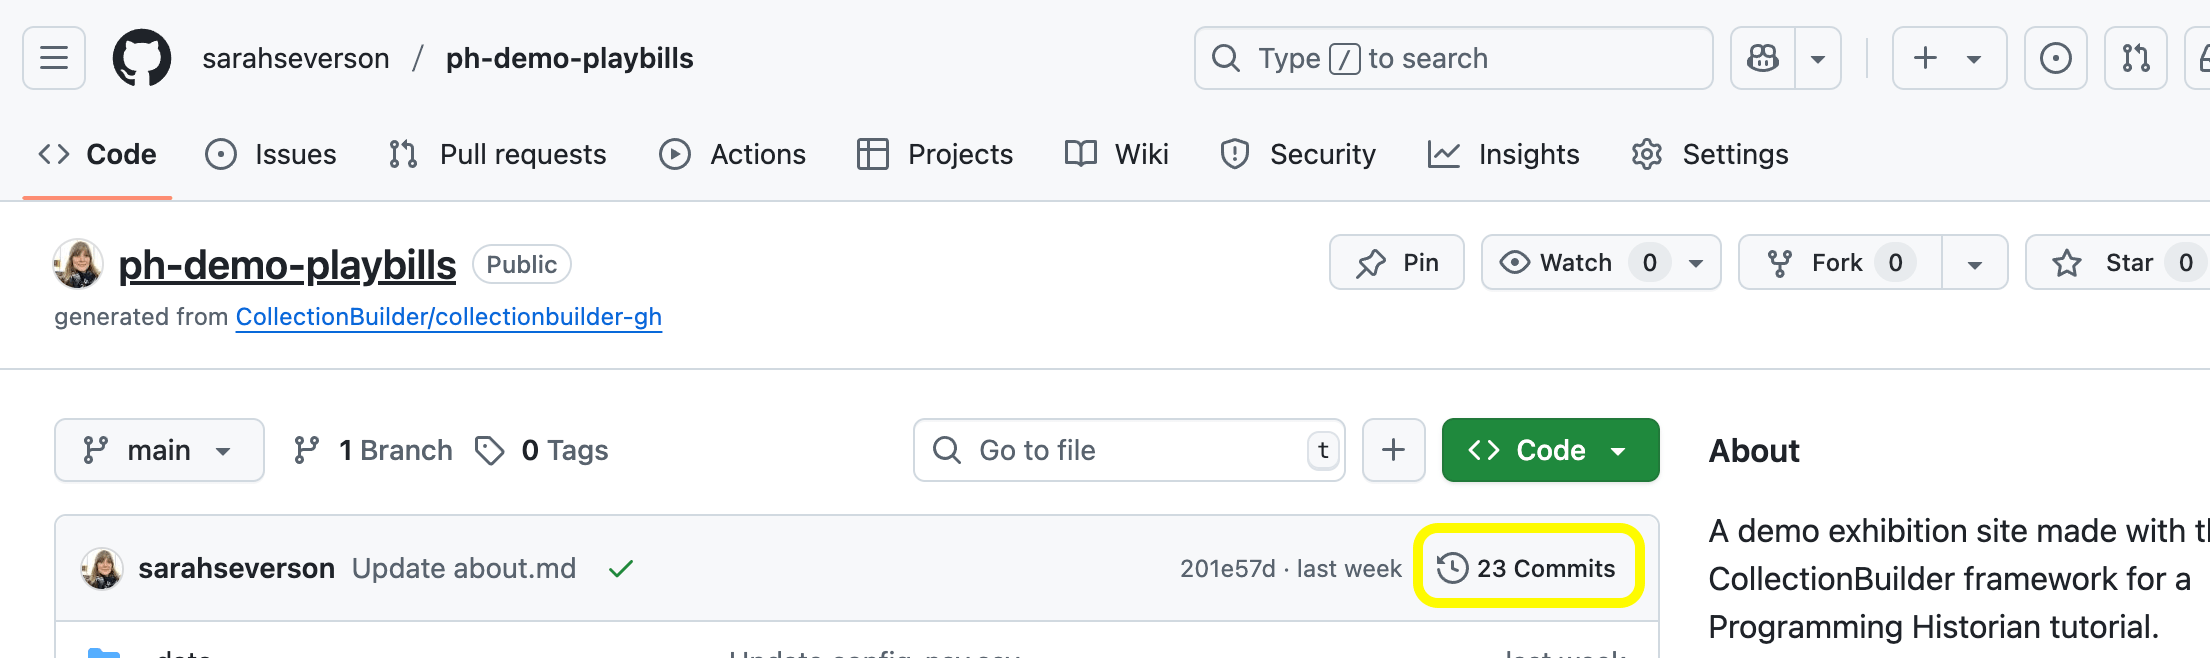
Figure 8. Screenshot of GitHub demo repository page with a circle around the Commits link, which you can use to check the status of your commits.
Once you’ve addressed any glitches, your website should be viewable online.
Customizing your digital exhibition
Now that your digital exhibition is available online, let’s customize it.
Home page
The first thing someone sees when they visit your site is the homepage, and there are several ways you can customize it to encourage readers to explore your exhibition.
The first change we will make is to add our logo and banner image, and update the text in the description box.
Open the _config.yml file again. Under #SITE SETTINGS, update your site’s title, tagline, and description.
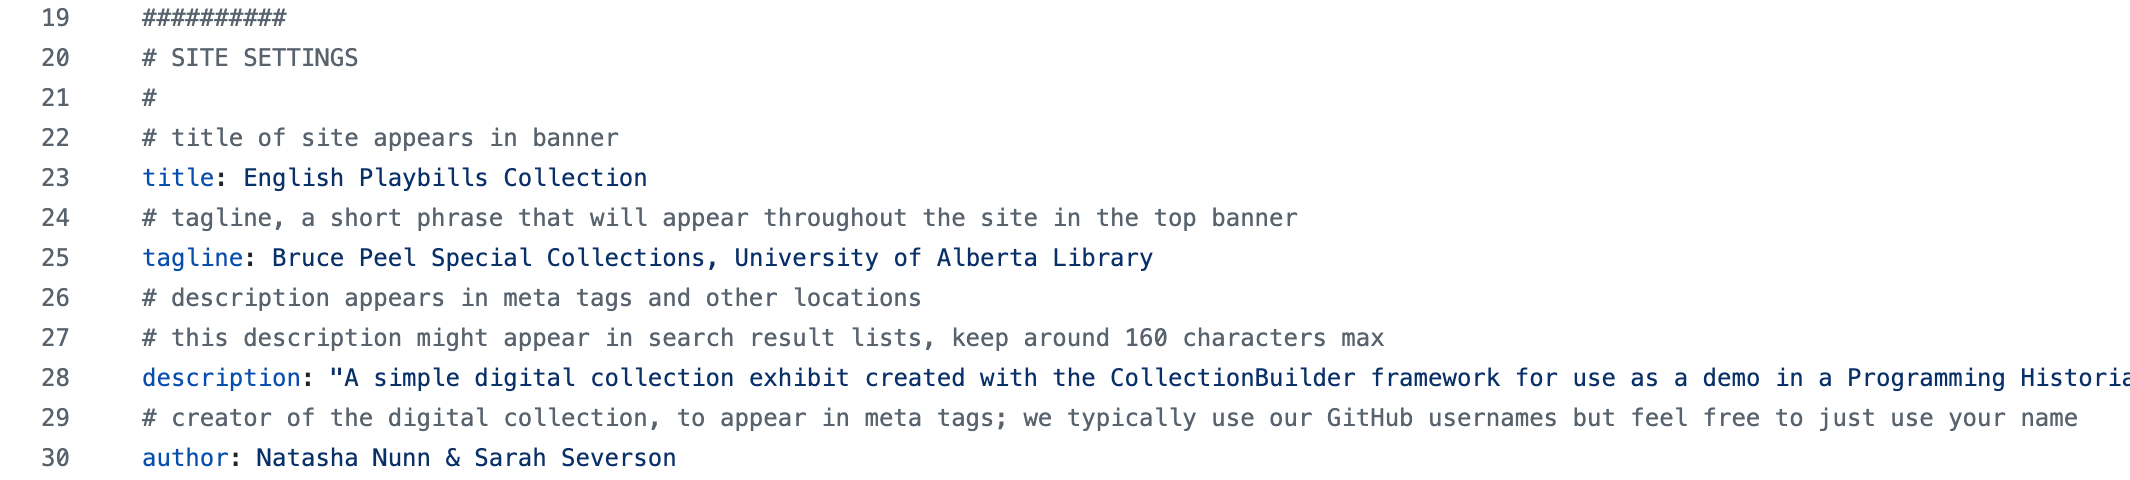
Figure 9. Screenshot of the relevant text to update your site’s title, tagline, and description in the config.yml file.
Under Site/Organization Branding section, you can add as much organizational information as you want. In this screenshot, you can see our library name and URL:

Figure 10. Screenshot of the relevant text in the config.yml file for updating your organizational information.
Next, add a banner or a featured image to the home page by editing the theme.yml in the _data folder. If your exhibition includes images, you can add the objectid of any image to feature it. This has the added advantage of automatically including a link to the featured image in your collection, as seen in the Psychiana Digital Collection example.
Since our collection consists solely of PDF objects, we created a collage of some covers for the banner. To use this file in your header, you need to first upload it to the /assets/img folder and then add that path to the theme.yml file in the _data folder.
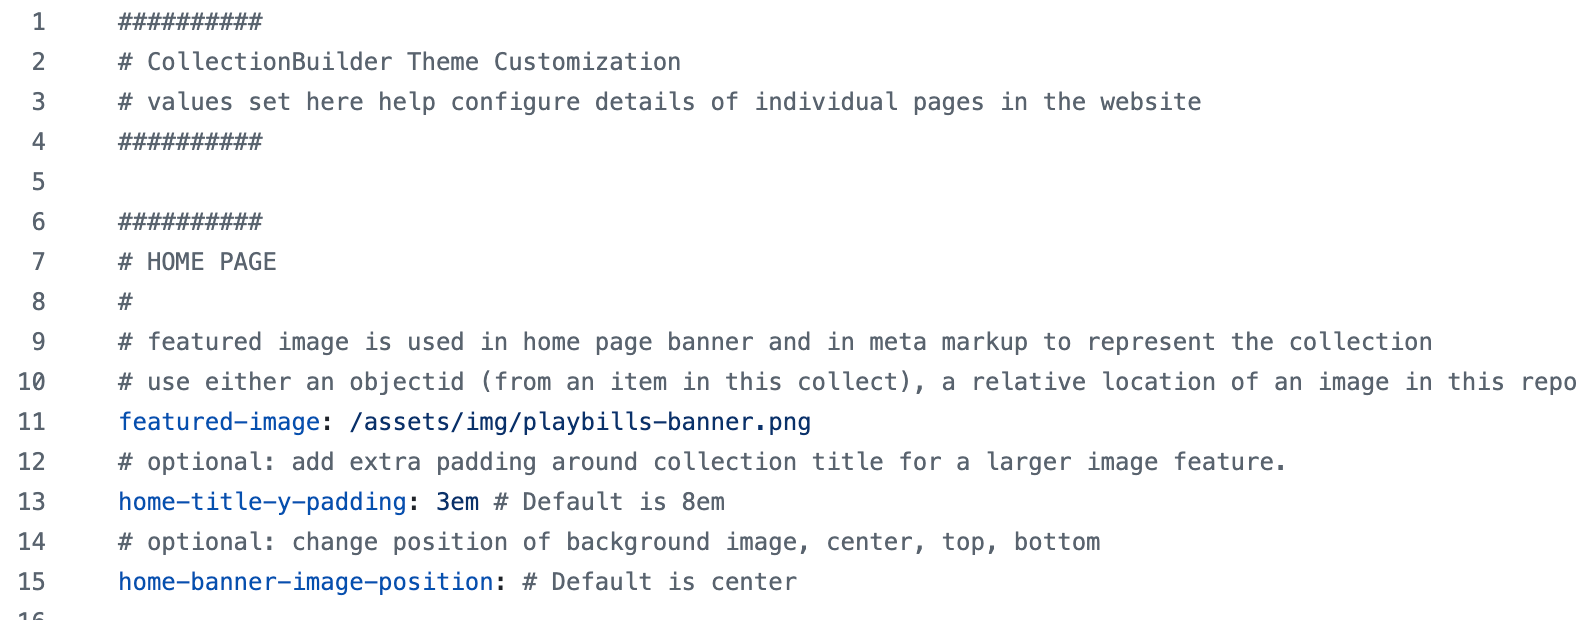
Figure 11. Screenshot of the relevant text in the theme.yml file for configuring the display of the banner image if you are not using an object from your collection.
You can also use an external URL if you want to host your banner somewhere outside the project.
Front page content boxes
Next, we can change the number and arrangement of content boxes on the template home page by editing the home-infographic.html file in the _layouts folder.
In our example, we have used the location metadata field to indicate the playbill’s physical location, which helps library staff retrieve the item if requested. However, you do not necessarily need to be able to browse that on the front page.
To delete that box, first locate line 19 of the code that includes field="location", then delete the entire line. In our demo, we also removed the objects box line of code on line 21, since everything in our example exhibition is a PDF and it did not provide the viewer with any useful information to browse. In another exhibit, if you have various media including PDFs, images and audio, this would be more helpful to your user.
The next thing you can do is change the order of the boxes. In our example, we moved the subject box to the top and pushed the timeline down. We also changed the title of the Subject box to Top Genre to better reflect the metadata.
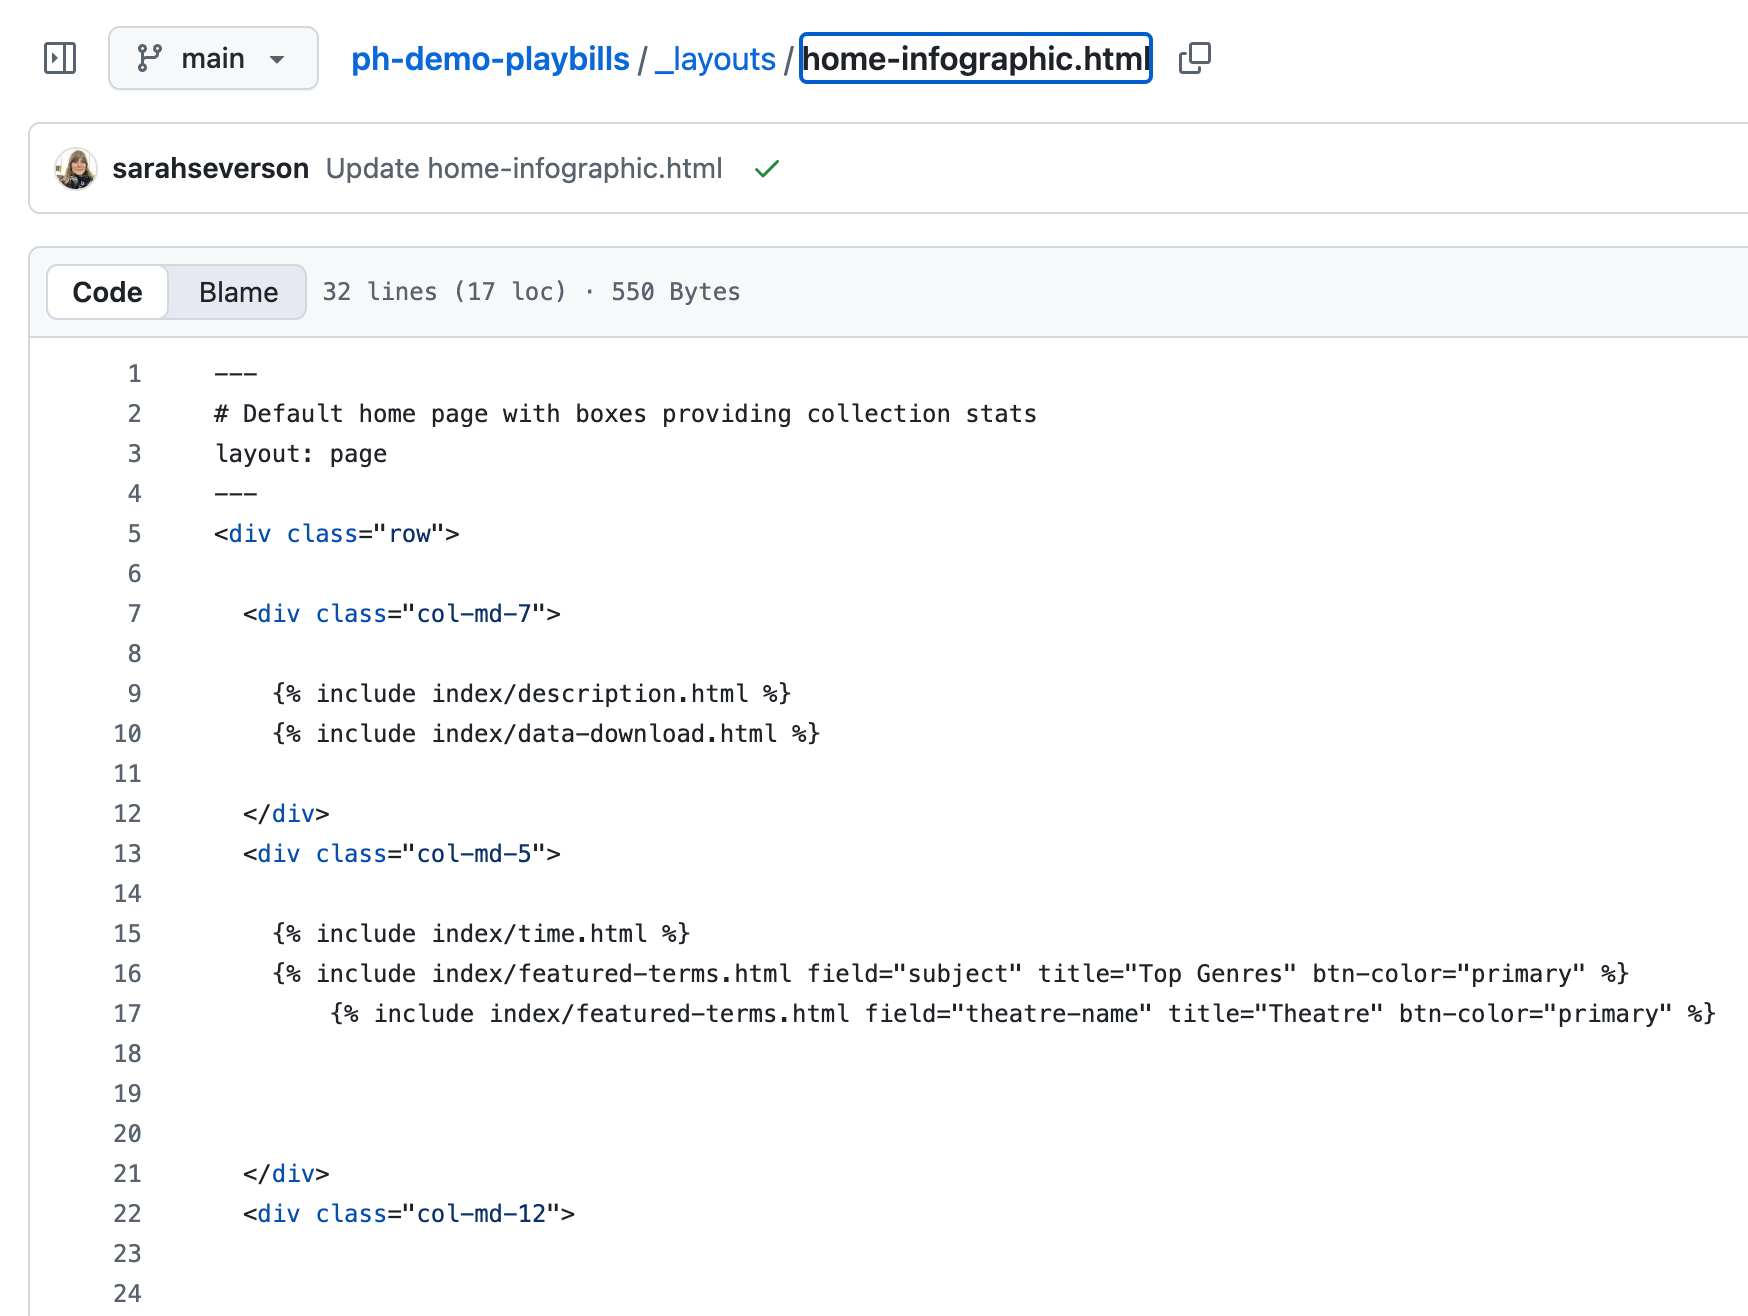
Figure 12. Screenshot of home-infographic.html code showing the changes to the box order and the title of the subject box.
Item page
Next, let’s examine the default item page, which displays your digital object and its corresponding metadata. There are a number of changes that can be made to the default page, including which metadata fields are shown, in what order, what the labels are, and whether we want them to interlink to other items on your site or include external links.
To make changes, go to the _data folder and open the config-metadata.csv file. The top row (1) is the table header row, which tells us what each column means. The first column field references the column name in your corresponding metadata CSV file, and display_name is the label on your item page. The browse_link and external_link columns are where you can turn on hyperlinking of fields or make a field link to an external website after each row below matches up to a metadata field that is displayed on your item page.
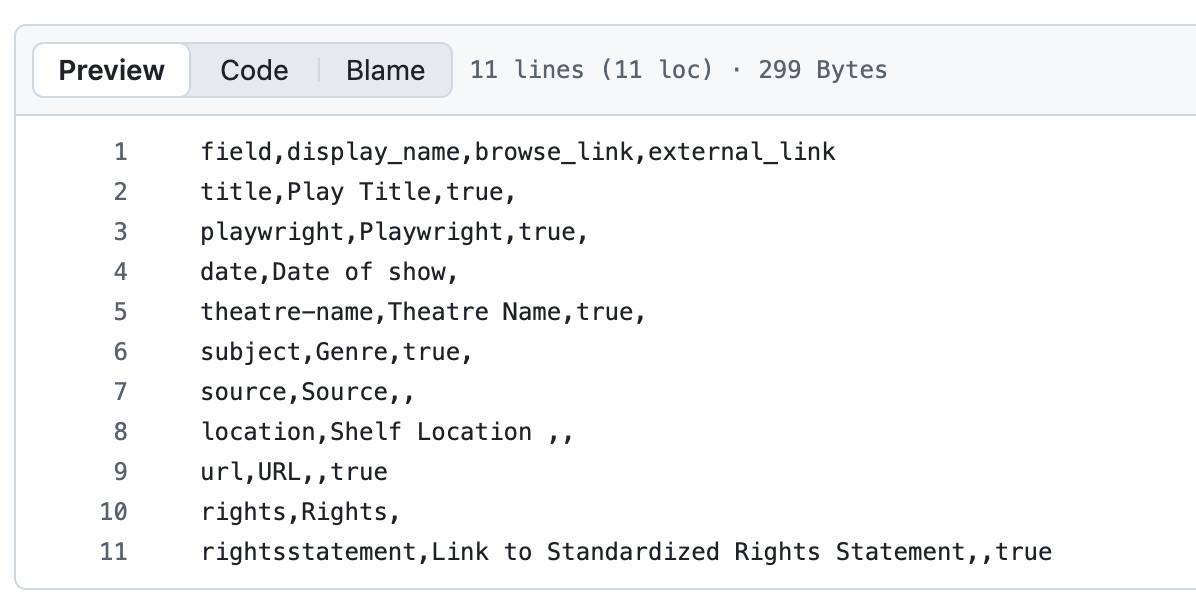
Figure 13. Screenshot of the config-metadata.csv file with the updates specified in the lesson.
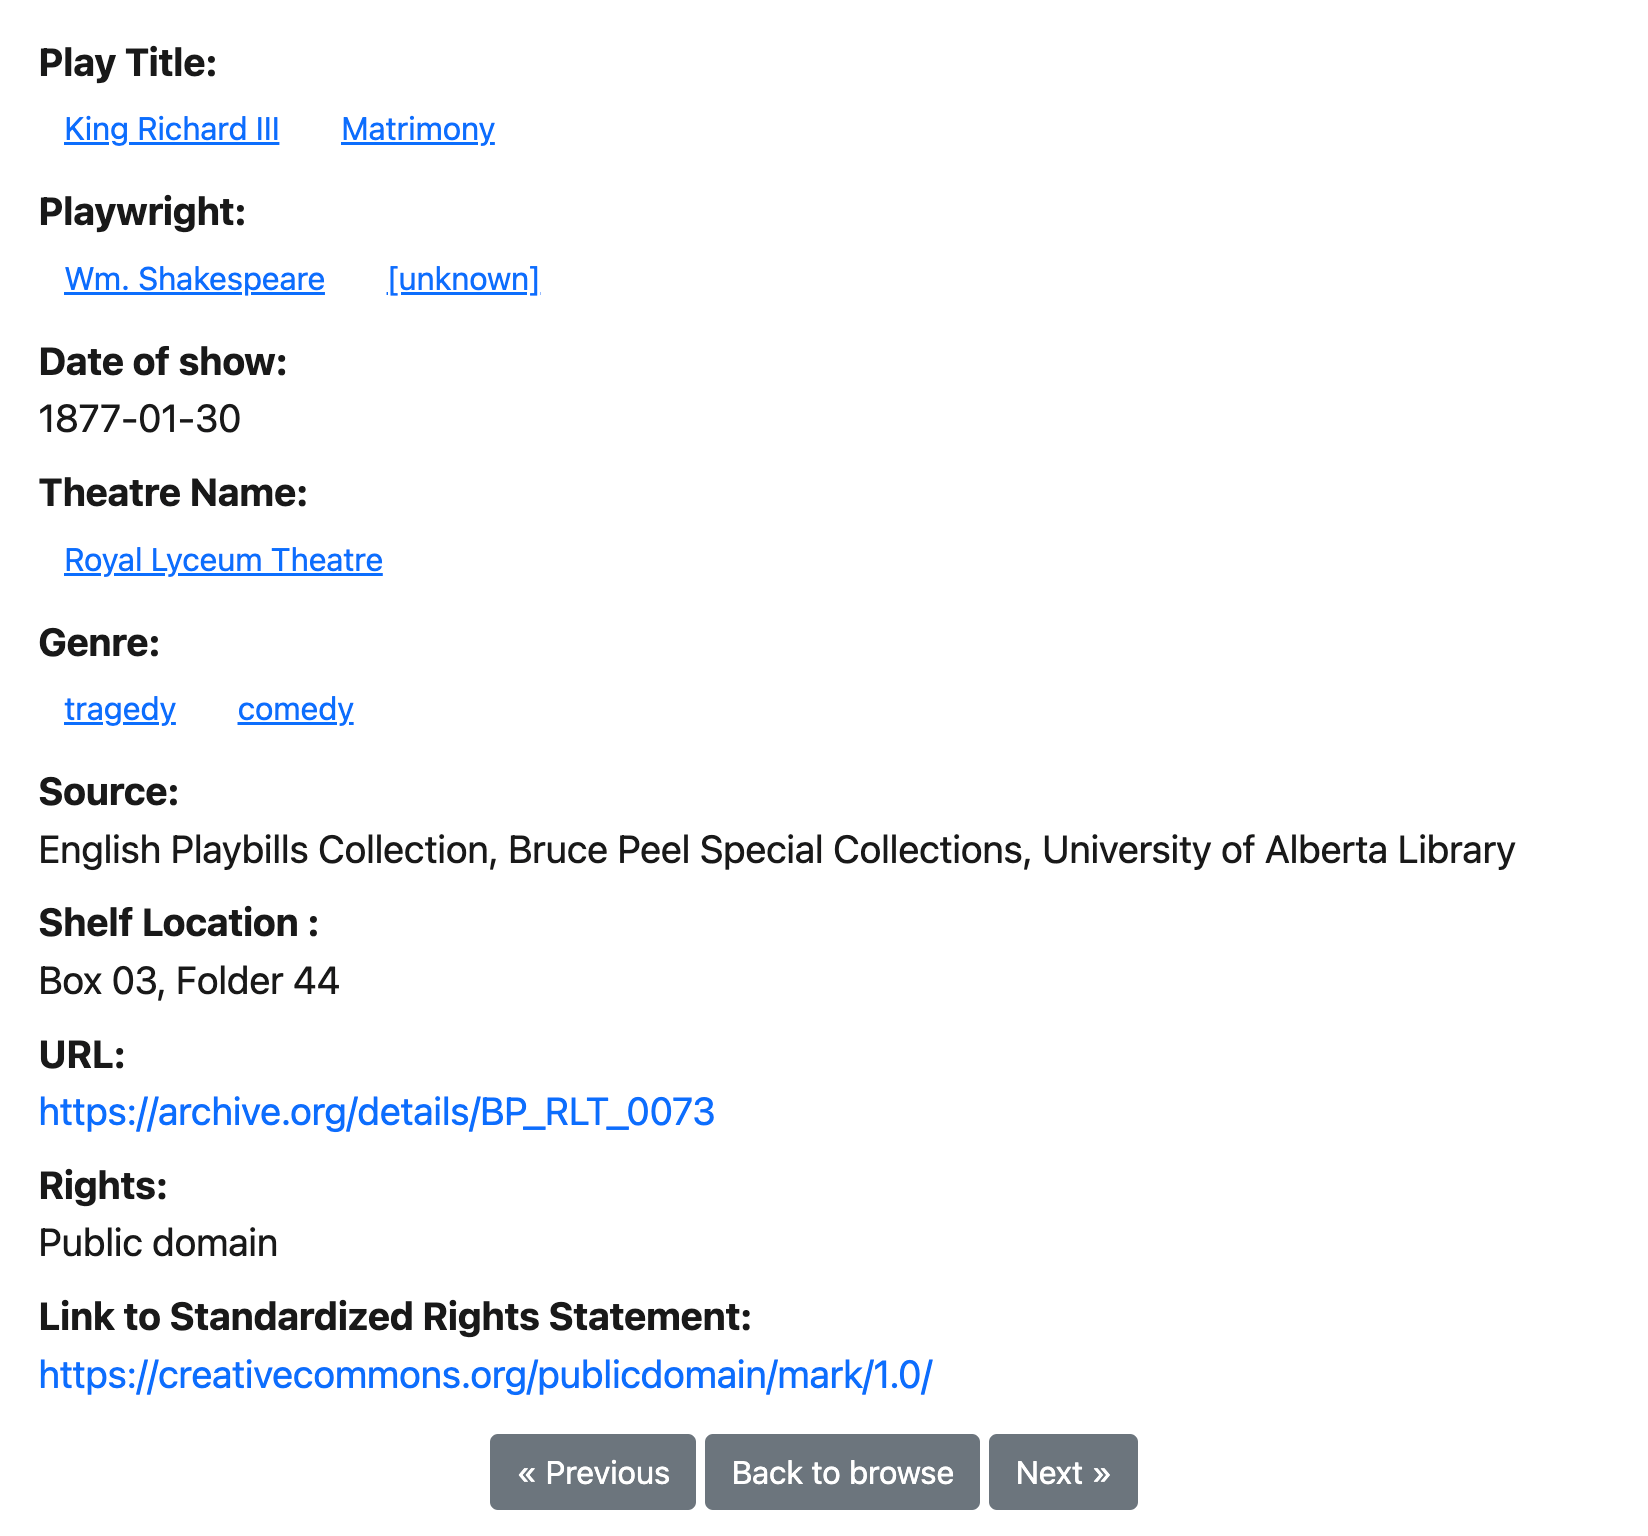
Figure 14. Screenshot of the metadata section of the demo exhibition to show the same changes from the config-metadata.csv file.
For the playbills example, we added new metadata terms specific to these materials to the item page, such as Playwright and Theatre Name, and changed the display_name of the title field to the more descriptive Play Title. We also wanted to encourage people to explore more playbills by a specific playwright or shown in a particular theatre, by making those fields browseable by editing the browse_link value to true.
In our example, some playbills advertise multiple plays with multiple playwrights. To ensure that those show up as separate values your visitor can browse, make sure they are separated in your metadata CSV with a semicolon. Then CollectionBuilder will automatically show that they are separate links.
Lastly, we added the item’s full URL for easier access. Add a new line near the bottom (line 11) and add the value true under external_link. This makes the ENTIRE field a hyperlink, so if you include text and a URL, it won’t work. The metadata field can contain text or an external link, but not both.
If you are using PDFs (as in our example) and would like to add thumbnails to your item page, we have instructions on our extra content page.
Configure search and browse experience
Related to metadata configuration is the search and browse configuration. If you add a new metadata field to your item page, you will also need to add it to the config-search.csv file in the _data folder to make it searchable. The second step to make the browse_link work will be to add the two fields to the config-browse.csv in the same _data folder.
Depending on your site goals and audience, you might want to add further customization. To learn about what more you can do, visit the CollectionBuilder customization documentation.
Information or Interpretive pages
One of the great things about building your online exhibition is that you can add as much information or as many interpretive pages as you like to tell the narrative of your collection. These pages are written in Markdown and can include various liquid formatting blocks and images.
Included in the template is an About page, which is an excellent place to include more information about your exhibition and collection of objects, such as:
- A brief description of why the exhibition exists
- Who is responsible for curating the objects presented in the digital collection?
- A list of credits for the people who worked on the exhibition
- What or who is responsible for creating and maintaining the site?
- Who is funding the project?
Editing the About page
All informational pages are written in Markdown and use a simple Jekyll formatting system to configure their display. To process them, all of these pages follow the YAML starter format that has three dashes (---) at the beginning and three at the end. The three elements needed to process the page are between these dashes: title, layout and permalink. This information will not be visible on the final page of your digital exhibition.
To edit the About page, navigate to the pages folder and find the about.md file. When you click on the pencil icon to edit, you will see that the file includes the YAML block explained above.
If you want to add a new page, you can follow the instructions in the CollectionBuilder documentation:
Navigation
The last thing you will edit for this lesson is the navigation bar. Similar in format to the item page fields, this component is managed in the config-nav.csv file found in the _data folder.
In our example, you could edit the display_name in the navigation bar from Subjects to Genres to match with our metadata. You could also remove any navigation items that you are not using.
With those final edits, you have a customized exhibition site that is ready for the world to see.
Conclusion
Congratulations! You have built a digital exhibition using CollectionBuilder-GH.
Whether your project is a one-time exhibition or part of a broader digital collection strategy, CollectionBuilder offers a flexible, open-source, minimal computing platform that scales with your needs and skills. Because it is built with static web technologies and uses interoperable standards, your exhibition is designed to last.
Beyond the technical skills you have developed, this lesson models a sustainable approach to digital scholarship: one that leverages existing infrastructure, maintains connections to authoritative sources, and prioritizes interpretation over infrastructure. By linking to canonical versions rather than duplicating materials, your exhibition participates in a broader digital ecosystem.
This is just the beginning. You can continue to refine your site, experiment with new features, or even migrate your project from the GH template to the more advanced CSV template.
The CollectionBuilder documentation is always there to guide you, and the community is very helpful. Don’t hesitate to reach out, share your project, or fork someone else’s project for inspiration.